The compilation art exhibit in Rocky's gallery was quite interesting. When I walked in and saw the paintings of the dancers and dress I knew it was going to be cool. I enjoyed the theme of the Flamenco dancers and how it related back to the artist. I also liked the real dress that was placed in the corner to add to the exhibit. I'm not sure if the paintings are something that I would put on my wall because I prefer photos or more subtle colors. But they were quite good.
The next exhibit with the fashion reminded me of the leg lamp off of "A Christmas Story". I chuckled and quite enjoyed it. It is quite fun drawing fashion things so I could relate in that way.
And the final exhibit of 99 pills was really interesting. I had no idea that Cassie had rheumatoid arthritis so it was interesting to take in what someone with that kind of thing has. It was a great visual display expressing the pains that go into the condition. It was very moving. I did like the various pictures and the entire set up it was very creative.
Thursday, December 3, 2009
Wednesday, December 2, 2009
Five Favorite Photos from presentation
 The above image was taken at Zimmerman Park. It is one of my favorite images because the tree was nicely silhouetted and you could also see the outline of the mountains, not to mention the amazing colors in the sky. It was taken on a tripod with f-stop of 14 and a shutter speed around 1/30.
The moon shot was taking also at Zimmerman park. It was a faster shutter speed and I think the f-stop was around 8. I enjoyed this picture for the rule of thirds as well as the detail that was found in the moons face. I have always wanted to take a picture of the moon and be able to see the face clearly and thankfully I was able to do so with this shot. The clouds that the moon is rising above also add to the scene and make it more than just a black sky.

The meadow shot was taken in Yellowstone National Park. It was during the day and partly cloudy so the shutter speed was a bit faster. I loved the colors and the contrast between all of the elements of the photo. I especially loved the shadows of the clouds and the red hills working together to make a good composition.

My bird nest picture was taken at Phipps park. I enjoy silhouetted trees and various aspects that help spice them up. the nest was a really cool element that added to the shot. I also loved that the rims were lit behind and the colors of the sky were subtle yet glorious. It's a shot that makes me feel warm inside every time I see it.

The final shot of the steaming pools at Yellowstone National Park is one of my favorites for many reasons. It is an image that is slightly calming and zen for me. The steps that shine because of the glass water provide the perfect area for reflections and they add to the contrasting elements of the photo. Another reason why I love this shot is because people that I show it to have come up to me days later and said, I still can't get that image out of my head. That to me is what photography is all about. We see so many images in a day but it is the images that people can't get out of their heads that counts the most!
CPC and other photography things in Chicago
Chicago Photography Center is an organization in Chicago that creates many opportunities for photographers of all skill levels. It is a non-profit school of types. They have many outreach events to supply cameras to those who would have never had the chance to use a camera otherwise.
In a way this organization reminds me of the girl from Yes Man who leads the running photography group. Many of their events involve community members meeting together. The organization supplies the cameras. Then the entire group goes to various places around Chicago and takes pictures.
This is quite an interesting organization and something to consider when I head back home. They also offer various classes and volunteer opportunities. The classes are around $500 each and go over things like beginning photography, lighting, advanced photography, portraiture, etc.
I was happy to see that there are some passionate photographers that have dedicated their skills to spreading photography to those who may not have had opportunity otherwise.
http://www.chicagophoto.org/classes/lighting/
The next website that I found while searching was the need for photographers on Craig's list. There was a specific post that made me chuckle. It was asking for photographers (or non photographers) that would want to take photos at Chicago's hot spots for tourists. What made me laugh was the fact that the people that were going to do this job were going to be paid $8.25 an hour. And there was no need for photography background. It just goes to show that the people that are taking pictures at the tourist hot spots in any area don't get paid much and sell their photos for ridiculous prices. It's almost more beneficial to know how to take the shot yourself. :)
Wednesday, November 18, 2009
Panning!!!
Not to brag or anything but I was pretty excited about this shot that I got... and yes it will be one of my final presentation shots no doubt! It was a godsend that the squirrels were out and about right as I came out of class on Tuesday! Check it out...
 I mean I couldn't have gotten his face more in focus had I tried!
 I mean I couldn't have gotten his face more in focus had I tried!
Cory Richards
This week as promised I have decided to write about Cory Richards. Last Tuesday, Cory Richards a Rocky Alum came to Mark's photography class to tell us about what he does.
It was quite an exciting presentation to hear. I have always wondered what I really wanted to do with photography. I have been asked many times what area I would like to go into. What do I want to focus on.
Cory came and told his story, he started out shooting fashion and then worked his way into being a paid climber as well as a photographer. He explained how his job as a climber sometimes turns into a photo job and vise versa.
Personally I love the outdoors and if people are willing to pay me for my photos if I go and hike mountains or climb rock faces I am all for it.
Cory is a very versatile photographer. Not only does he shoot sports but he is working on other pieces that include portraits and landscapes. It was great to hear that you don't necessarily have to pick one form of photography and stick to it. If I like taking pictures in general then I can go and take pictures in general. There should be nothing holding me back from doing it all.
It was great to hear Cory's story and get some tips from him. The link is below if you would like to check out his work.
http://www.crichardsphoto.com/#portfolio
Monday, November 16, 2009
Info on Photos
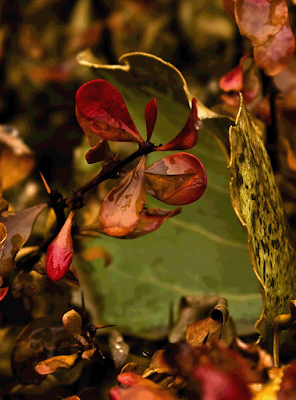
Use of the color red
Shutter 1/13
ISO 100
F-stop 7.1
I had these settings b/c of the low light and how I wanted the leaves to be in focus.
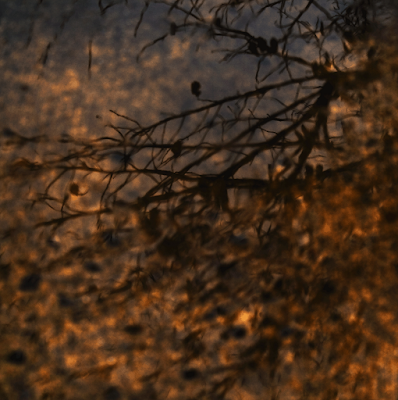
A reflection as a main point of interest
Shutter 1/20
ISO 100
f-stop: 5.6
This shot was a reflection off of the sidewalk. I found it interesting and wanted the shutter speed to be as fast as I could with the weather conditions getting constantly worse.
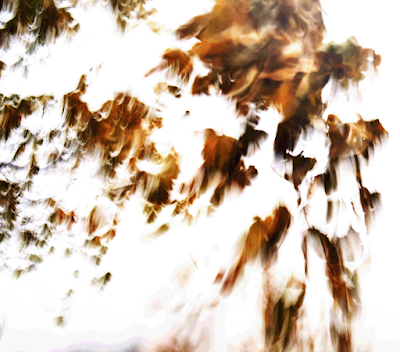
A silhouette as a main point of interest
Shutter .8 sec
ISO 100
f-stop: 36
I was actually trying to get infinite focus and forgot to change the settings when I moved to close ups. It turned out that I accidentally got a silhouette shot in the process.
Use of your lenses hyperfocal settings
shutter 1.6
ISO 100
f-st0p 18
It was difficult to get the hyperfocal shot during the day due to the snowfall but I got one later in the evening when the walk way was nicely illuminated with the white snow. It wasn't exactly the shot that I wanted but it was pretty good.
Use of panning (with at least one "sharp" element)
shutter 1/20
ISO 100
f-stop 5.6
This shot took many different tries. It is difficult to pan especially in blustery weather. I felt the leaves being thrown were good examples of trying to pan with a subject. And the thrower's hand was what I mostly got in focus.
Blurred motion
shutter 1/15
ISO 100
f-stop 5.6
This was another leaf shot. I captured the motion of the leaves and let them dance in the viewfinder to get the shot. I'd say it was fairly successful.
A detailed close up
shutter 1/13
ISO 100
f-stop 10
I think this is the one I am most proud of. The settings had to be tampered with a few times to get the colors that I wanted but I was pleased with the dew and the leaf placement.
Clear use of the "Rule of Thirds"
Shutter 1/13
ISO 100
f-stop 7.1
This is another red leaf shot. I liked the leaves and the water working to make a type of reflection. It worked out that this would be the rule of thirds because it was properly in focus with a nicely blurred back ground.
You pick :)
shutter 1/13
ISO 100
f-stop 10
I enjoyed the way the water brought out the veins in the leaf so I chose to crop down and focus in on the water on the leaf as opposed to everything going on around.
Shutter 1/13
ISO 100
F-stop 7.1
I had these settings b/c of the low light and how I wanted the leaves to be in focus.
A reflection as a main point of interest
Shutter 1/20
ISO 100
f-stop: 5.6
This shot was a reflection off of the sidewalk. I found it interesting and wanted the shutter speed to be as fast as I could with the weather conditions getting constantly worse.
A silhouette as a main point of interest
Shutter .8 sec
ISO 100
f-stop: 36
I was actually trying to get infinite focus and forgot to change the settings when I moved to close ups. It turned out that I accidentally got a silhouette shot in the process.
Use of your lenses hyperfocal settings
shutter 1.6
ISO 100
f-st0p 18
It was difficult to get the hyperfocal shot during the day due to the snowfall but I got one later in the evening when the walk way was nicely illuminated with the white snow. It wasn't exactly the shot that I wanted but it was pretty good.
Use of panning (with at least one "sharp" element)
shutter 1/20
ISO 100
f-stop 5.6
This shot took many different tries. It is difficult to pan especially in blustery weather. I felt the leaves being thrown were good examples of trying to pan with a subject. And the thrower's hand was what I mostly got in focus.
Blurred motion
shutter 1/15
ISO 100
f-stop 5.6
This was another leaf shot. I captured the motion of the leaves and let them dance in the viewfinder to get the shot. I'd say it was fairly successful.
A detailed close up
shutter 1/13
ISO 100
f-stop 10
I think this is the one I am most proud of. The settings had to be tampered with a few times to get the colors that I wanted but I was pleased with the dew and the leaf placement.
Clear use of the "Rule of Thirds"
Shutter 1/13
ISO 100
f-stop 7.1
This is another red leaf shot. I liked the leaves and the water working to make a type of reflection. It worked out that this would be the rule of thirds because it was properly in focus with a nicely blurred back ground.
You pick :)
shutter 1/13
ISO 100
f-stop 10
I enjoyed the way the water brought out the veins in the leaf so I chose to crop down and focus in on the water on the leaf as opposed to everything going on around.
Sunday, November 15, 2009
Rainy day continued
Here are the remainder of the assigned shots.
Shot 4. Use of lenses hyperfocal settings -

Shot 8. Clear use of rule of 3rds-

Shot 9. You Pick-

Shot 4. Use of lenses hyperfocal settings -

Shot 8. Clear use of rule of 3rds-

Shot 9. You Pick-

Thursday, November 12, 2009
Rainy day assignment
We were to take nine shots, but I was unable to get a few of them due to weather. My camera was getting quite wet and preventing me from getting the shots.
Here's what I got:
1. Use of the color red
 Shot 2. A reflection as a main point of interest
Shot 3. A silhouette as a main point of interest
 Shot 4. Use of your lenses hyperfocal settings
(was not able to capture this shot)
Shot 5. Use of Panning (with at least one "sharp" element)

Shot 6. Blurred Motion
Shot 7. A detailed close up
Here's what I got:
1. Use of the color red
 Shot 2. A reflection as a main point of interest
Shot 3. A silhouette as a main point of interest
 Shot 4. Use of your lenses hyperfocal settings
(was not able to capture this shot)
Shot 5. Use of Panning (with at least one "sharp" element)

Shot 6. Blurred Motion

Shot 7. A detailed close up

Wednesday, November 11, 2009
Evelyn Hofer
This week I found out that Evelyn Hofer had passed away at the age of 87. For me it wasn't all that sad considering I was not enlightened that she was alive in the first place. Yet it did tickle my fancy to see what her work was all about.
She was an interesting photographer who focused mainly on portraits but also took a tangent in her 6 decade career to focus on still lifes.
She was born in Germany and moved to Mexico in 1942 then moved to New York in '46. The remainder of her life was spent moving between the two places. It was pretty interesting. She was an apprentice before she went into fashion photography but soon came to find she'd rather photograph real people in real events.
Her works are quite good. They do have a somber feel to them. But it was her style people liked it and I'm sure some people didn't find it good at all.
Looking at her work and reading her story has helped me to realize even more how many doors there are to be opened by photographers. Every event needs to be photographed. Every company needs a photographer. It's just a matter of finding what you love doing, what you love shooting and getting out there and taking the job. Evelyn had a 6 decade career. She obviously found something she loved doing. Reviews said that she should be considered one of the top photographers from the 20th century, yet I didn't see what was so extremely great about her work. It goes to show that beauty truly is in the eye of the beholder. And if you get enough people to agree with you that something is beautiful then you can make a career for yourself.
Extension Tubes
After reading the section on The Close-up World and talking with Dave I have come to the conclusion that extension tubes are the way to go.
It is much more practical if you are one who likes to shoot a wide range of shots to have extension tubes and telephoto converters for your longer lenses as opposed to carrying an entire lens. Not to mention cheaper. The extension tubes and telephoto converter are a fraction of a price that you would pay to buy the whole macro lens. This leaves your assets open to purchase either a more versatile lens or to up grade the camera body. The telephoto converters and extension tubes also allow you to be further away from your subject (if you use them with your 500) which is an added advantage especially if your subject is slightly skiddish.
Having a macro lens is not a bad thing but when you are placed in circumstances where weight or space matters then it is more fitting to take the small and compact converters with your big lens so you are able to shoot a wider range of shots as opposed to confining yourself to strictly shooting macro or strictly shooting telephoto.
Thursday, November 5, 2009
Zimmerman Park
This week I headed out to Zimmerman park to shoot. I went up during sunset and later found I had not dress appropriately. Once the sun went down it got very cold.
It was an advantageous shoot I thought. I shot many sunset pictures then a few pictures overlooking Billings. I messed around with car lights streaking across the frame and other things. When we were heading back to the car the moon was coming up as a harvest moon and it was gorgeous! Yet I soon found out that without a telephoto lens I was not going to get the shot that I wanted.
I later edited the photos and had some okay shots of the moon but it instilled in me a great desire to get a telephoto lens so I can zoom in on the shots that come up only every once in a while.
I did find that Zimmerman park is quite hard to photograph at times. There aren't too many spots that I got to the other day that you can capture great shots from. But I suppose i'll have to keep trying.
Part 4
Part 4 was an interesting section that had a few things I knew and a few things I didn't know.
The first section finding photogenic landscapes was insightful. It began by explaining that a photographer must first take into consideration color. When you are hopefully going to sell your work color is a big deal. If you choose colors that are not attractive to the human eye you are basically sabotaging your own work. Next comes how you are going to work the colors into your shot. Much of it is up to the photographers style but it also depends on what the colors add and subtract from the composition.
Next he talked about atmospheric things that can happen to make your shot energized. For example a shot that has snow falling, big clouds, fog, or mist will be more interesting (most of the time) than an open landscape shot from the perspective of a tourist. Use what God created to your advantage, get up before the fog rolls out and work it.
When you are setting up a shot you also have to keep in mind camera angle. By choosing a North/South angle you will have sidelight illumination which is great for showing the textures in a landscape that otherwise looks flat.
The writer touches on, as before, The fact that a foreground is very important in putting together a landscape. He also talked about setting up the landscape and then letting the animals come into it as they please. This way you will have a nice picture already and the animals can only add to it.
Lastly the thing that will make the difference is eliminating signs of human life from the landscape. Telephone poles, mailboxes, etc. all get in the way and take away from the shot (in most cases).
In the next section: Power of Perspective, the writer talks of many things that help out a landscape. He explained how to portray depth and having size cues in the frame. These things help to make the landscape more interesting and to pop out at you as opposed to being a flat picture. In addition the angle of view can make or break a photo. Take an angle that people don't normally take.
Again he talks about side light and atmospherics. He explains that the atmospherics can at times be a pain when you are trying to get every part of the shot clear. But it is something that all photographers run in to at one point or another.
The last main point he made was the five planes: forground, cloud plane, sky plane, midground, and the feature plane. All of which help to come together as a great photo.
In the last section: Mystical Mirrors, the writer explains the advantages of having a pool of water to shoot with. He first explains some of the equipment that you need to get great water shots and how to orient them. Again he says that nothing can beat shooting in the early morning or late afternoon when the sun is rising and setting.
He explains that the pools that are shielded are more advantageous because you will get a crystal reflection. The more they are guarded the less disturbances there will be in the water.
Next you need to pull out the filters to help make the shot great. Neutral density filters and polarizing filters work well. Combinations of these filters will help out immensely when working with the lighting of your shot on a pool of water.
Sunday, November 1, 2009
Getting Close and Animals in Action
After reading the section Getting Close, I was reminded of a few tips and enlightened of a few more. Here are the highlights:
To begin, you should not head out and shoot animals before you know about their them. Get on the internet and look them up, see what your subject is all about. See what season they are out so you don't waste hundreds on a plane ticket b/c you didn't get them in the right season for the animal that you are shooting.
Next bring the proper equipment for the job. A lens that is 300mm or more is better than not having any telephoto power. Animals will not be in their natural state if you are two feet away from them and cramping their style so to speak. Though animals can smell your sent and pick up on your actions it is sometimes beneficial to have a blind, be it a portable blind or your car. In some cases strobes may be beneficial for shooting wildlife. It is good to be prepared for all situations.
After you have the proper equipment and have educated yourself it is time to start shooting. When approaching wildlife there are a few guidelines: stay low, talk low and soft to let the animal know you are not a threat, it is good to approach from an angle without making eye contact (when you make eye contact it sets most animals into defense mode b/c you come off as a predator), and lastly move slowly with subtle movements. If your subject seems uneasy sit down and wait. Patience is a virtue when working with animals that are not used to you. It is not likely that you will go in shoot the shot and still have the entire day ahead of you. The day will be spent waiting and convincing the animals that you aren't going to hurt them.
To get even closer some photographers bribe their subjects with peanut butter or other natural food products, but personally I think it is cheating and taking the adventure out of it. In addition bribing the animals takes away from the fun of becoming one with nature and the subjects.
The last thing to remember is to never corner in your subject. Leave them an out. If you don't you are going to increase your chances of getting attacked a thousand fold.
The next section was Animals in Action:
There are many tips in this section that are very similar to the previous section. First you must do your homework again. You must know about the subject you are shooting. What are their habits, when do the come out? Are they nocturnal? How do they land on a perch? How do they react to threats (if you accidentally threaten them)?
After you have done this you need to change your sleep patterns. To get the best shots of animals in action one must be set up in their position before sunrise. During sunrise and sunset are the best times to shoot animals in action and coincidentally the best time to shoot photos in general.
While you are setting up, you must choose the height of your tripod. Since the key to wildlife photography is shooting the eye in sharp focus it is common to set up your pod to be eye level with your subject. And while setting up your camera to shoot put it on burst mode. Make sure you have enough memory to take many shots and not have to go through and delete. You can sort later, if you sort on site you will miss opportunities.
Next you need to work on your focusing technique. Auto focus takes time to work, if you know a subjects behavior you can focus on a perch or to the destination and be ready when they move. Again patience is a virtue.
In some cases, for example humming birds, you can build a set for your shot. Get the subject used to coming to your set. Then you will be able to set up strobes and get the best shot possible.
Thursday, October 29, 2009
Warhol and Richard Avedon
This week I looked up a couple of artists. First was Andy Warhol. Though he was not particularly a photographer he did make great strides in the art world. He had a different perspective on art than most people. He knew that if he chose icons, people, or symbols that people were tied to he would be more successful and that's what he did. Below is a quote about what he thought of coca-cola. I thought it was really interesting and a good perspective to keep in mind.
What's great about this country is that America started the tradition where the richest consumers buy essentially the same things as the poorest. You can be watching TV and see Coca Cola, and you know that the President drinks Coca Cola, Liz Taylor drinks Coca Cola, and just think, you can drink Coca Cola, too. A coke is a coke and no amount of money can get you a better coke than the one the bum on the corner is drinking. All the cokes are the same and all the cokes are good. Liz Taylor knows it, the President knows it, the bum knows it, and you know it.
Next is a quote from Warhol after he had been shot and gone through intensive surgeries.
Warhol had this to say about the attack: "Before I was shot, I always thought that I was more half-there than all-there – I always suspected that I was watching TV instead of living life. People sometimes say that the way things happen in movies is unreal, but actually it's the way things happen in life that's unreal. The movies make emotions look so strong and real, whereas when things really do happen to you, it's like watching television – you don't feel anything. Right when I was being shot and ever since, I knew that I was watching television. The channels switch, but it's all television."
Andy Warhol had a very unique perspective of Art and he wasn't afraid to stand apart from other artists. He was considered and idol as well as a nuisance for what he did but he did what he loved. He also supported the arts in many different ways. He was unique and had original perspectives which is a good thing to keep in mind for any of us who are trying to make it in the art world.
http://en.wikipedia.org/wiki/Andy_Warhol
The next artist I looked at was Richard Avedon. He is an amazing photographer. When I read about him I only wish that I could be as cool as he was. :)
Avedon began his career as a photographer of the merchant marines ID cards. He eventually moved on to work with Vogue and other popular magazines. He opened his own studio and began taking portraits that were minimalist (with his subjects placed in front of white backgrounds). What made his work different than others though was the fact that he wanted to capture the soul of the person he was taking a picture of. To do this he would ask probing questions or guide the conversation into interesting, uncomfortable, or touchy areas. He was awesome at it.
On top of doing portraits he also covered social events such as protests, mental institutions, and civil rights movements. He is definitely a photographer who had an extremely rich career. And like Warhol had a very creative way of doing things and it worked for him.
Both were men that made strides in the art world and have many ideas and characteristics that would help any artist to note.
http://www.richardavedon.com/#s=0&a=0&mi=2&pt=1&pi=10000&p=6&at=0
http://en.wikipedia.org/wiki/Richard_Avedon
Wednesday, October 21, 2009
Weekend Shoot
 This weekend I was fortunate enough to get to go up north and visit my cousins. There were some great settings for portraits. Here are a few of the shots that I enjoy...
The blog does not do these shots justice in the least.
Thankfully the kids are used to a camera being around them all the time so for hte most part they cooperate when I need to get a good shot :)


Designing the Picture Space

Designing the picture space is a good section to know. It is fairly difficult to play by all of the rules but it is also very important to know and understand all of the rules. It is a learning experience going through all of the elements and trying to figure out what I could change about my own work. I chose a picture of my little cousin to show how I chose to design the space.
She was wearing the cool tones that don't attract as much attention as the yellow and orange leaves but I felt she was a large enough part of the shot that she would receive attention. I placed her on the right line of thirds and her head as close to the top third line as I could. This places her head in an intersecting line and as I have learned it's a good spot for a point of interest. In addition to these things I have left the road in the picture. Roads are elements that help carry your eye through the picture. I feel in this shot it carries the viewer's eye around and helps them to wonder where she is coming from with such a grin on her face.
Sunday, October 18, 2009
Photo Project
For this past week I decided to blog about the photo trip that Ashley, Andy, and I planned to South America. It was much more time consuming than I would have thought but, I guess that's what it takes when you are planning such an excursion.
I was really excited when Andrew came across some private tours in South America. They are all quite considerably cheep which is awesome! I am actually thinking I probably need to go on one of the tours. I have always loved traveling and this project really showed me that I can get some great shots wherever I go and can use them for my benefit. It has helped me to form some goals as far as photography goes.
It is also important to think about how you are going to market yourself. It has reminded me that I need to keep looking and getting to know more and more photographers and learn from their experiences. It's been an eye opening project!
Wednesday, October 7, 2009
Nobel Prize in Physics
This week I read an article that Mark sent me about this year's Nobel Prize winners in Physics. It was about the two men that came together and invented the CCD "storage" computer chip but then found that it recorded images digitally.
This small invention in turn led to digital imaging in satellites and the cameras inside our phones. It is an amazing accomplishment.
I also found it interesting that the men that invented the imaging device were just friends that got together and bounced ideas off of each other. It was just by chance of them hanging out and throwing ideas around, and the intent to make a computer storage unit that they came up with an amazing invention.
It's funny how the world works and changes so rapidly and many times it is just by chance.
http://www.npr.org/templates/story/story.php?storyId=113527362
Wednesday, September 30, 2009
Sports Photographers vs Sports Mothers with good cameras
This week I found an article about a sports photographer and his competition with mothers that get their hands on nice DSLR cameras. It was interesting to see how much people pay someone to come to a football game and take pictures of their children. The guy in the article made a career out of high school parents wanting him to come shoot their child in action.
But the article was focused on how there are many people getting into photography and just giving their shots away so you have to find ways to compete. He has an interesting business venture. At the football games he takes the shots and then sets up a trailer where parents can come in and choose pictures that they'd like to purchase on the spot.
In the end when you are competing with soccer mom's and cameras it's all about the creativity and budget crunching you can do to get your product on the top.
http://www.pdnonline.com/pdn/content_display/features/pdn-online/e3id4b973c6ccee64b49cf392379b2bf88e
Monday, September 28, 2009
 Here are the shots that I used to portray deep depth of field, shallow depth of field, long exposure (with movement), and short exposure.
To the left is Zach walking, this is portraying the long shutter speed with movement. It is extremely hard to pan with moving objects, I have found.
Pic Info:
Cannon Rebel XS (all shots with this camera)
f-stop: f/5.0
ISO:100 (all shots with this ISO)
Shutter: 1/5


Next is the picture of the orchid. It is used to portray shallow depth of field.
Pic Info:
f-stop: f/5.6
shutter: 1/13 sec
 Above is another picture of my Orchid. It is displaying the deep depth of field. The pictures uploaded do not portray it as well as the originals.
Pic Info:
f-stop: f/25.0
shutter: 8.0 sec
Lastly is the picture of the football game. This picture is used to portray short exposure or short shutter speed. Any picture taken this day was almost guaranteed to have a short shutter speed due to how bright it was.
Pic Info:
f-Stop: f/8.0
Shutter: 1/400 sec
Wednesday, September 23, 2009
Accomplishing the Shot
For the four shots narrow depth of field, wide depth of field, short exposure, and long exposure with moving I have many different ideas.
For the narrow depth of field it is most often used for macro subject matter or for having one object stand out in a shot with the other details blurred. A narrow depth of field is accomplished by opening up the aperture and focusing in on the particular subject in mind. This will keep the subject (how much depends on how far the aperture is open) in focus and the surrounding area blurred. For this type of shot, if shot in daylight, it is important to make the shutter speed quite fast so that the colors or image is not washed out.
For a deep/wide depth of field the aperture is raised so that the opening is smaller. This increases the focus field. It is important to increase the shutter speed so it is not as fast as a narrow depth of field. Since the aperture is smaller more light is required to get the intended shot.
A short exposure requires a wider aperture in most cases since the shutter is not open for long light needs to be let in in some other way. A shorter shutter speed is signified by 1 over a large number. These are used to freeze motion.
And lastly a longer shutter speed with motion may require the panning motion. With a longer shutter speed the aperture should be smaller depending on the light. If it is late in the evening the aperture must be relatively wide open with a long shutter speed in order to allow as much light as possible into the shot, especially if it is shot at a low ISO. The longer shutter speed is good for running water shots.
Yellowstone National Park
 This weekend I took a trip to Yellowstone National Park with Mark Moak's photography class. It was a very fun and exciting weekend full of opportunities for shooting. It was frustrating at times though because it was hard to get some of the shots you wanted when you don't have access to telephoto lenses. I was able to figure out the silky water effect and the long exposures used to capture stars and lightening which was good practice. Here are a couple of the shots from the shoot.
The frustrations I faced during the trip were due to the clarity of the shot and focus. I was wishing for most of the trip that I could have filters, telephoto lenses, and a better tripod. But I suppose that will all come in time :)

Wednesday, September 16, 2009
Exposure
Exposure in digital cameras has three components to potentially change the exposure. These three components are aperture size, shutter speed, and ISO.
First it is good to understand aperture size. The aperture is simply how big the opening is for light to hit the sensor and collect an image. If all other settings are constant and the aperture is the only component being changed, the lower the aperture the bigger the opening and thus more light. If this blows parts of the image out you are able to raise the aperture number thus making the opening smaller and letting less light through to the sensors. Just remember the bigger the f-stop (what aperture is measured in) the smaller the hole. It is also important to keep in mind that aperture changes depth of field. This is why we have three components for exposure so we can find the right balance.
Next is the shutter speed. The shutter speed is the timing of how long light will be allowed through the size of hole (or aperture/f-stop) that you chose. Once you think about it, it is easy to figure out the longer the shutter is open the more light that will hit the sensors. And the opposite, the shorter the shutter speed the less light that will be allowed through the aperture.
Finally we have ISO. This is basically the sensitivity of the pixels. Most photographers stay in the lowest ISO settings as much as possible because it has less noise. Yet the higher ISO settings are good for night shots and picking up the small details. You just have to remember that the higher the ISO the more noise will enter the shot.
It is best to see if you can get the shot by fluctuating the aperture and shutter speed before you choose to lower your ISO. You'll be much happier with your shots and how sharp they are. The best way to get these things in your head is to take your camera out and practice. Sit in one spot and take the shot with changing all of the settings. You'll figure it out pretty quick :)
Goth Photography
This week I decided to type in photography into google and see what I came up with. Turns out I was taken to photography.com that happened to have very interesting articles. The article that caught my eye was called Goth photography. It explained about the Goth subculture and how it effects the Goth style of photography.
I found the subject matter really original. It most likely would not be my subject matter of choice but it makes me think about the possibilities. It also opened my eyes to just how much there is out there to photograph.
Here's the link if you're interested:
http://www.photography.com/articles/types-of-photography/gothic-photography/
Wednesday, September 9, 2009
Anne Geddes
I read an article about Anne Geddes for this weeks blog. It was quite interesting. I have only ever known Anne for her calendars and pictures of babies in flowers. But it was interesting to find out that she knew her passion of photography from when she was a teenager and she went with it. She did work in many different areas of photography until eventually finding her niche in photographing children and making "fairy tales" with her pictures. It was pretty interesting and I enjoyed seeing where life can take you before you actually get to a place where you want to be, or a place where you really thrive.
supertelophoto
It was good to read the super telephoto section in the book. It has some very good tips that you wouldn't get when you were out to purchase a lens from a store. It was also good to see it reiterated that it is good to camouflage your big lenses in order to draw the least amount of attention possible.
I also appreciated the tips that he gave as to some of the common issues that people have with their super-telephoto lenses. It takes work to get a good shot, and it's good to hear some of the things that pros do to get the best possible shot with their resources.
As for what lens I would purchase, I think I would choose the 500mm lens. Tim explains that the 500mm focal length is good if you are willing to get off the beaten path and search out a shot as apposed to just sitting and waiting for something to come. I'm all about the adventure of a shot and if I purchase a lens that is good for that then it would work out just right. I would also like the 500mm because my camera body is cropped frame and Mr. Fitzharris said it is a good lens for those cameras.
Monday, September 7, 2009
Section 1 Thoughts
This next part of section one that we were to read was very interesting to me. I really appreciated all of the tips on gear and packing. I especially liked the explanation as to why Tim prefers the vests and belts as opposed to using a pack. It makes me want to invest in a vest and a belt for carrying things. I found it a little funny that this weekend I went out to take pictures and I had my things in a backpack and it was inaccessible and really annoying. I could relate to what he was talking about. In addition to his talk on gear for packing I enjoyed the tips on dressing for cold weather. Here in Montana it's good to hear what other people do in order to stay warm when you do want to shoot in cold weather. I especially liked the garbage bag tip to protect the inside of your camera from the extreme changes in temperature.
The last part of the section just added to the fire that burns inside of me and pushes me to travel all that I can. Though I have been many places there are so many more places I have added to my list because of the beauty they provide for shots. I'm excited to get out there and see where it leads me.
The last part of the section just added to the fire that burns inside of me and pushes me to travel all that I can. Though I have been many places there are so many more places I have added to my list because of the beauty they provide for shots. I'm excited to get out there and see where it leads me.
Wednesday, September 2, 2009
Tripods
I have a tripod on the way... At least I think I do. I asked my mother for one for my birthday so we'll see if it's the truth.
As for which kind of tripod I would like I prefer the tripod over the mono-pod. I tend to try and be so still that I cause myself to shake the camera. In the Digital Photography Book by Scott Kelby he talks about the awesome benefits of a ball head tripod. They are pretty expensive but maybe some time down the road I'll get enough spare money to invest in one. Until then I will use what I can get, this may be a phonebook on a rock or creative placement of the camera. ;)
As for which kind of tripod I would like I prefer the tripod over the mono-pod. I tend to try and be so still that I cause myself to shake the camera. In the Digital Photography Book by Scott Kelby he talks about the awesome benefits of a ball head tripod. They are pretty expensive but maybe some time down the road I'll get enough spare money to invest in one. Until then I will use what I can get, this may be a phonebook on a rock or creative placement of the camera. ;)
 Here are some of the pictures I was talking about on the first day that we were talking about our favorite shots. On the left is the tree of wonders that I was talking about... I wish I could have captured the large live branches that were coming out of this tree. The live branches had wonderful pears on them!

Next we have the pictures of Buddy. If I he was a human he'd be a jock, he never stops running and playing even if he is dying of thirst. Not to mention he is about 300% muscle. But I caught him finally taking a break (to the left) and then again looking like he's the boss of the entire house (below). I'll be excited to get back home after I have completed these photography classes and can capture these things in more detail.
This week I checked out one of the articles on Luminous-landscape.com by Peter Cox. It was an article on perspective. It was interesting to read that perspective is often a key asset that is missed when photographers set up a shot. It kind of makes me think of all of the different projects that I could do with various perspectives. I like reading about various aspects that other photographers pick up on because it helps to spark my creativity and sets my mind running on ideas for my next shoot. Here's the link...
http://luminous-landscape.com/essays/changing-perspective.shtml
http://luminous-landscape.com/essays/changing-perspective.shtml
Tuesday, August 25, 2009
Wide-Angle lenses and why I would like one
I chose to read an article that I found on Google written by Darwin Wiggett. It actually turned out to be a great article for me to read. I have been considering purchasing more lenses for my camera but I didn't know which one would be most beneficial to have first.
After reading Darwin's article about wide-angle fixed focal length lenses I was sold. He had some great tips on how to use these lenses and what they benefits are for them. I especially enjoyed his shots that he has achieved with this type of lens. His tip is to "get close, and then get closer" for taking wide-angle shots. I enjoy this aspect of photography. I love getting up close to things and basically being in the shot and experiencing it up close and personal. I much prefer being up close than far away with a telephoto lens.
Needless to say I am quite excited to start scoping out wide-angle lenses and see what I can accomplish with one. You should check it out...
http://www.naturephotographers.net/articles0403/dw0403-1.html
Subscribe to:
Posts (Atom)