 I mean I couldn't have gotten his face more in focus had I tried!
Wednesday, November 18, 2009
Panning!!!
Not to brag or anything but I was pretty excited about this shot that I got... and yes it will be one of my final presentation shots no doubt! It was a godsend that the squirrels were out and about right as I came out of class on Tuesday! Check it out...
 I mean I couldn't have gotten his face more in focus had I tried!
I mean I couldn't have gotten his face more in focus had I tried!
Cory Richards
This week as promised I have decided to write about Cory Richards. Last Tuesday, Cory Richards a Rocky Alum came to Mark's photography class to tell us about what he does.
It was quite an exciting presentation to hear. I have always wondered what I really wanted to do with photography. I have been asked many times what area I would like to go into. What do I want to focus on.
Cory came and told his story, he started out shooting fashion and then worked his way into being a paid climber as well as a photographer. He explained how his job as a climber sometimes turns into a photo job and vise versa.
Personally I love the outdoors and if people are willing to pay me for my photos if I go and hike mountains or climb rock faces I am all for it.
Cory is a very versatile photographer. Not only does he shoot sports but he is working on other pieces that include portraits and landscapes. It was great to hear that you don't necessarily have to pick one form of photography and stick to it. If I like taking pictures in general then I can go and take pictures in general. There should be nothing holding me back from doing it all.
It was great to hear Cory's story and get some tips from him. The link is below if you would like to check out his work.
http://www.crichardsphoto.com/#portfolio
Monday, November 16, 2009
Info on Photos
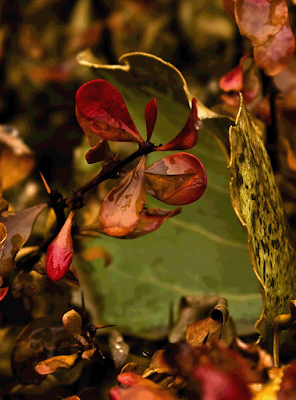
Use of the color red
Shutter 1/13
ISO 100
F-stop 7.1
I had these settings b/c of the low light and how I wanted the leaves to be in focus.
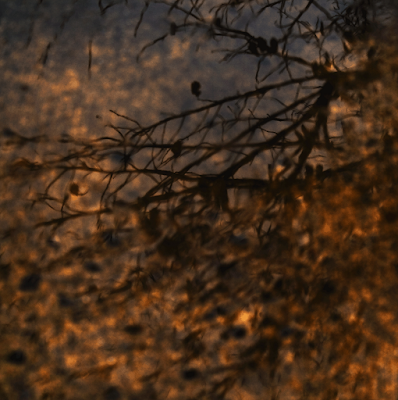
A reflection as a main point of interest
Shutter 1/20
ISO 100
f-stop: 5.6
This shot was a reflection off of the sidewalk. I found it interesting and wanted the shutter speed to be as fast as I could with the weather conditions getting constantly worse.
A silhouette as a main point of interest
Shutter .8 sec
ISO 100
f-stop: 36
I was actually trying to get infinite focus and forgot to change the settings when I moved to close ups. It turned out that I accidentally got a silhouette shot in the process.
Use of your lenses hyperfocal settings
shutter 1.6
ISO 100
f-st0p 18
It was difficult to get the hyperfocal shot during the day due to the snowfall but I got one later in the evening when the walk way was nicely illuminated with the white snow. It wasn't exactly the shot that I wanted but it was pretty good.
Use of panning (with at least one "sharp" element)
shutter 1/20
ISO 100
f-stop 5.6
This shot took many different tries. It is difficult to pan especially in blustery weather. I felt the leaves being thrown were good examples of trying to pan with a subject. And the thrower's hand was what I mostly got in focus.
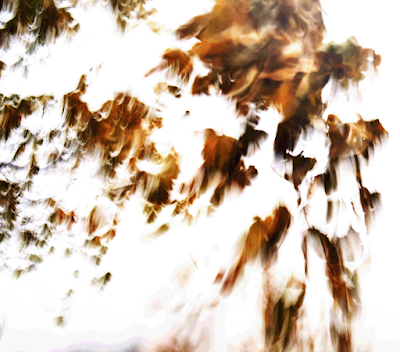
Blurred motion
shutter 1/15
ISO 100
f-stop 5.6
This was another leaf shot. I captured the motion of the leaves and let them dance in the viewfinder to get the shot. I'd say it was fairly successful.
A detailed close up
shutter 1/13
ISO 100
f-stop 10
I think this is the one I am most proud of. The settings had to be tampered with a few times to get the colors that I wanted but I was pleased with the dew and the leaf placement.
Clear use of the "Rule of Thirds"
Shutter 1/13
ISO 100
f-stop 7.1
This is another red leaf shot. I liked the leaves and the water working to make a type of reflection. It worked out that this would be the rule of thirds because it was properly in focus with a nicely blurred back ground.
You pick :)
shutter 1/13
ISO 100
f-stop 10
I enjoyed the way the water brought out the veins in the leaf so I chose to crop down and focus in on the water on the leaf as opposed to everything going on around.
Shutter 1/13
ISO 100
F-stop 7.1
I had these settings b/c of the low light and how I wanted the leaves to be in focus.
A reflection as a main point of interest
Shutter 1/20
ISO 100
f-stop: 5.6
This shot was a reflection off of the sidewalk. I found it interesting and wanted the shutter speed to be as fast as I could with the weather conditions getting constantly worse.
A silhouette as a main point of interest
Shutter .8 sec
ISO 100
f-stop: 36
I was actually trying to get infinite focus and forgot to change the settings when I moved to close ups. It turned out that I accidentally got a silhouette shot in the process.
Use of your lenses hyperfocal settings
shutter 1.6
ISO 100
f-st0p 18
It was difficult to get the hyperfocal shot during the day due to the snowfall but I got one later in the evening when the walk way was nicely illuminated with the white snow. It wasn't exactly the shot that I wanted but it was pretty good.
Use of panning (with at least one "sharp" element)
shutter 1/20
ISO 100
f-stop 5.6
This shot took many different tries. It is difficult to pan especially in blustery weather. I felt the leaves being thrown were good examples of trying to pan with a subject. And the thrower's hand was what I mostly got in focus.
Blurred motion
shutter 1/15
ISO 100
f-stop 5.6
This was another leaf shot. I captured the motion of the leaves and let them dance in the viewfinder to get the shot. I'd say it was fairly successful.
A detailed close up
shutter 1/13
ISO 100
f-stop 10
I think this is the one I am most proud of. The settings had to be tampered with a few times to get the colors that I wanted but I was pleased with the dew and the leaf placement.
Clear use of the "Rule of Thirds"
Shutter 1/13
ISO 100
f-stop 7.1
This is another red leaf shot. I liked the leaves and the water working to make a type of reflection. It worked out that this would be the rule of thirds because it was properly in focus with a nicely blurred back ground.
You pick :)
shutter 1/13
ISO 100
f-stop 10
I enjoyed the way the water brought out the veins in the leaf so I chose to crop down and focus in on the water on the leaf as opposed to everything going on around.
Sunday, November 15, 2009
Rainy day continued
Here are the remainder of the assigned shots.
Shot 4. Use of lenses hyperfocal settings -

Shot 8. Clear use of rule of 3rds-

Shot 9. You Pick-

Shot 4. Use of lenses hyperfocal settings -

Shot 8. Clear use of rule of 3rds-

Shot 9. You Pick-

Thursday, November 12, 2009
Rainy day assignment
We were to take nine shots, but I was unable to get a few of them due to weather. My camera was getting quite wet and preventing me from getting the shots.
Here's what I got:
1. Use of the color red
 Shot 2. A reflection as a main point of interest
Shot 3. A silhouette as a main point of interest
 Shot 4. Use of your lenses hyperfocal settings
(was not able to capture this shot)
Shot 5. Use of Panning (with at least one "sharp" element)

Shot 6. Blurred Motion
Shot 7. A detailed close up
Here's what I got:
1. Use of the color red
 Shot 2. A reflection as a main point of interest
Shot 3. A silhouette as a main point of interest
 Shot 4. Use of your lenses hyperfocal settings
(was not able to capture this shot)
Shot 5. Use of Panning (with at least one "sharp" element)

Shot 6. Blurred Motion

Shot 7. A detailed close up

Wednesday, November 11, 2009
Evelyn Hofer
This week I found out that Evelyn Hofer had passed away at the age of 87. For me it wasn't all that sad considering I was not enlightened that she was alive in the first place. Yet it did tickle my fancy to see what her work was all about.
She was an interesting photographer who focused mainly on portraits but also took a tangent in her 6 decade career to focus on still lifes.
She was born in Germany and moved to Mexico in 1942 then moved to New York in '46. The remainder of her life was spent moving between the two places. It was pretty interesting. She was an apprentice before she went into fashion photography but soon came to find she'd rather photograph real people in real events.
Her works are quite good. They do have a somber feel to them. But it was her style people liked it and I'm sure some people didn't find it good at all.
Looking at her work and reading her story has helped me to realize even more how many doors there are to be opened by photographers. Every event needs to be photographed. Every company needs a photographer. It's just a matter of finding what you love doing, what you love shooting and getting out there and taking the job. Evelyn had a 6 decade career. She obviously found something she loved doing. Reviews said that she should be considered one of the top photographers from the 20th century, yet I didn't see what was so extremely great about her work. It goes to show that beauty truly is in the eye of the beholder. And if you get enough people to agree with you that something is beautiful then you can make a career for yourself.
Extension Tubes
After reading the section on The Close-up World and talking with Dave I have come to the conclusion that extension tubes are the way to go.
It is much more practical if you are one who likes to shoot a wide range of shots to have extension tubes and telephoto converters for your longer lenses as opposed to carrying an entire lens. Not to mention cheaper. The extension tubes and telephoto converter are a fraction of a price that you would pay to buy the whole macro lens. This leaves your assets open to purchase either a more versatile lens or to up grade the camera body. The telephoto converters and extension tubes also allow you to be further away from your subject (if you use them with your 500) which is an added advantage especially if your subject is slightly skiddish.
Having a macro lens is not a bad thing but when you are placed in circumstances where weight or space matters then it is more fitting to take the small and compact converters with your big lens so you are able to shoot a wider range of shots as opposed to confining yourself to strictly shooting macro or strictly shooting telephoto.
Thursday, November 5, 2009
Zimmerman Park
This week I headed out to Zimmerman park to shoot. I went up during sunset and later found I had not dress appropriately. Once the sun went down it got very cold.
It was an advantageous shoot I thought. I shot many sunset pictures then a few pictures overlooking Billings. I messed around with car lights streaking across the frame and other things. When we were heading back to the car the moon was coming up as a harvest moon and it was gorgeous! Yet I soon found out that without a telephoto lens I was not going to get the shot that I wanted.
I later edited the photos and had some okay shots of the moon but it instilled in me a great desire to get a telephoto lens so I can zoom in on the shots that come up only every once in a while.
I did find that Zimmerman park is quite hard to photograph at times. There aren't too many spots that I got to the other day that you can capture great shots from. But I suppose i'll have to keep trying.
Part 4
Part 4 was an interesting section that had a few things I knew and a few things I didn't know.
The first section finding photogenic landscapes was insightful. It began by explaining that a photographer must first take into consideration color. When you are hopefully going to sell your work color is a big deal. If you choose colors that are not attractive to the human eye you are basically sabotaging your own work. Next comes how you are going to work the colors into your shot. Much of it is up to the photographers style but it also depends on what the colors add and subtract from the composition.
Next he talked about atmospheric things that can happen to make your shot energized. For example a shot that has snow falling, big clouds, fog, or mist will be more interesting (most of the time) than an open landscape shot from the perspective of a tourist. Use what God created to your advantage, get up before the fog rolls out and work it.
When you are setting up a shot you also have to keep in mind camera angle. By choosing a North/South angle you will have sidelight illumination which is great for showing the textures in a landscape that otherwise looks flat.
The writer touches on, as before, The fact that a foreground is very important in putting together a landscape. He also talked about setting up the landscape and then letting the animals come into it as they please. This way you will have a nice picture already and the animals can only add to it.
Lastly the thing that will make the difference is eliminating signs of human life from the landscape. Telephone poles, mailboxes, etc. all get in the way and take away from the shot (in most cases).
In the next section: Power of Perspective, the writer talks of many things that help out a landscape. He explained how to portray depth and having size cues in the frame. These things help to make the landscape more interesting and to pop out at you as opposed to being a flat picture. In addition the angle of view can make or break a photo. Take an angle that people don't normally take.
Again he talks about side light and atmospherics. He explains that the atmospherics can at times be a pain when you are trying to get every part of the shot clear. But it is something that all photographers run in to at one point or another.
The last main point he made was the five planes: forground, cloud plane, sky plane, midground, and the feature plane. All of which help to come together as a great photo.
In the last section: Mystical Mirrors, the writer explains the advantages of having a pool of water to shoot with. He first explains some of the equipment that you need to get great water shots and how to orient them. Again he says that nothing can beat shooting in the early morning or late afternoon when the sun is rising and setting.
He explains that the pools that are shielded are more advantageous because you will get a crystal reflection. The more they are guarded the less disturbances there will be in the water.
Next you need to pull out the filters to help make the shot great. Neutral density filters and polarizing filters work well. Combinations of these filters will help out immensely when working with the lighting of your shot on a pool of water.
Sunday, November 1, 2009
Getting Close and Animals in Action
After reading the section Getting Close, I was reminded of a few tips and enlightened of a few more. Here are the highlights:
To begin, you should not head out and shoot animals before you know about their them. Get on the internet and look them up, see what your subject is all about. See what season they are out so you don't waste hundreds on a plane ticket b/c you didn't get them in the right season for the animal that you are shooting.
Next bring the proper equipment for the job. A lens that is 300mm or more is better than not having any telephoto power. Animals will not be in their natural state if you are two feet away from them and cramping their style so to speak. Though animals can smell your sent and pick up on your actions it is sometimes beneficial to have a blind, be it a portable blind or your car. In some cases strobes may be beneficial for shooting wildlife. It is good to be prepared for all situations.
After you have the proper equipment and have educated yourself it is time to start shooting. When approaching wildlife there are a few guidelines: stay low, talk low and soft to let the animal know you are not a threat, it is good to approach from an angle without making eye contact (when you make eye contact it sets most animals into defense mode b/c you come off as a predator), and lastly move slowly with subtle movements. If your subject seems uneasy sit down and wait. Patience is a virtue when working with animals that are not used to you. It is not likely that you will go in shoot the shot and still have the entire day ahead of you. The day will be spent waiting and convincing the animals that you aren't going to hurt them.
To get even closer some photographers bribe their subjects with peanut butter or other natural food products, but personally I think it is cheating and taking the adventure out of it. In addition bribing the animals takes away from the fun of becoming one with nature and the subjects.
The last thing to remember is to never corner in your subject. Leave them an out. If you don't you are going to increase your chances of getting attacked a thousand fold.
The next section was Animals in Action:
There are many tips in this section that are very similar to the previous section. First you must do your homework again. You must know about the subject you are shooting. What are their habits, when do the come out? Are they nocturnal? How do they land on a perch? How do they react to threats (if you accidentally threaten them)?
After you have done this you need to change your sleep patterns. To get the best shots of animals in action one must be set up in their position before sunrise. During sunrise and sunset are the best times to shoot animals in action and coincidentally the best time to shoot photos in general.
While you are setting up, you must choose the height of your tripod. Since the key to wildlife photography is shooting the eye in sharp focus it is common to set up your pod to be eye level with your subject. And while setting up your camera to shoot put it on burst mode. Make sure you have enough memory to take many shots and not have to go through and delete. You can sort later, if you sort on site you will miss opportunities.
Next you need to work on your focusing technique. Auto focus takes time to work, if you know a subjects behavior you can focus on a perch or to the destination and be ready when they move. Again patience is a virtue.
In some cases, for example humming birds, you can build a set for your shot. Get the subject used to coming to your set. Then you will be able to set up strobes and get the best shot possible.
Subscribe to:
Posts (Atom)